The Local newsletter is your free, daily guide to life in Colorado. For locals, by locals.
Teresa Castaneda has been dumpster diving for nearly four decades, ever since her grandfather encouraged her to forage for scraps on their regular runs to the garbage dump. This, along with a year of homelessness when she was 19, cultivated the Denver artist’s fascination with turning junk into art. The Denver County Fair and the Denver Art Museum have shown Castaneda’s ReArranging Denver, a traveling installation of playground-like exhibits made of repurposed trash, and the Denver Art Museum sold her roses (made from empty tissue boxes and Starbucks cups) as part of its recent In Bloom exhibit. We asked the 46-year-old artist to create three do-it-yourself projects for the holidays. Here’s what she came up with:
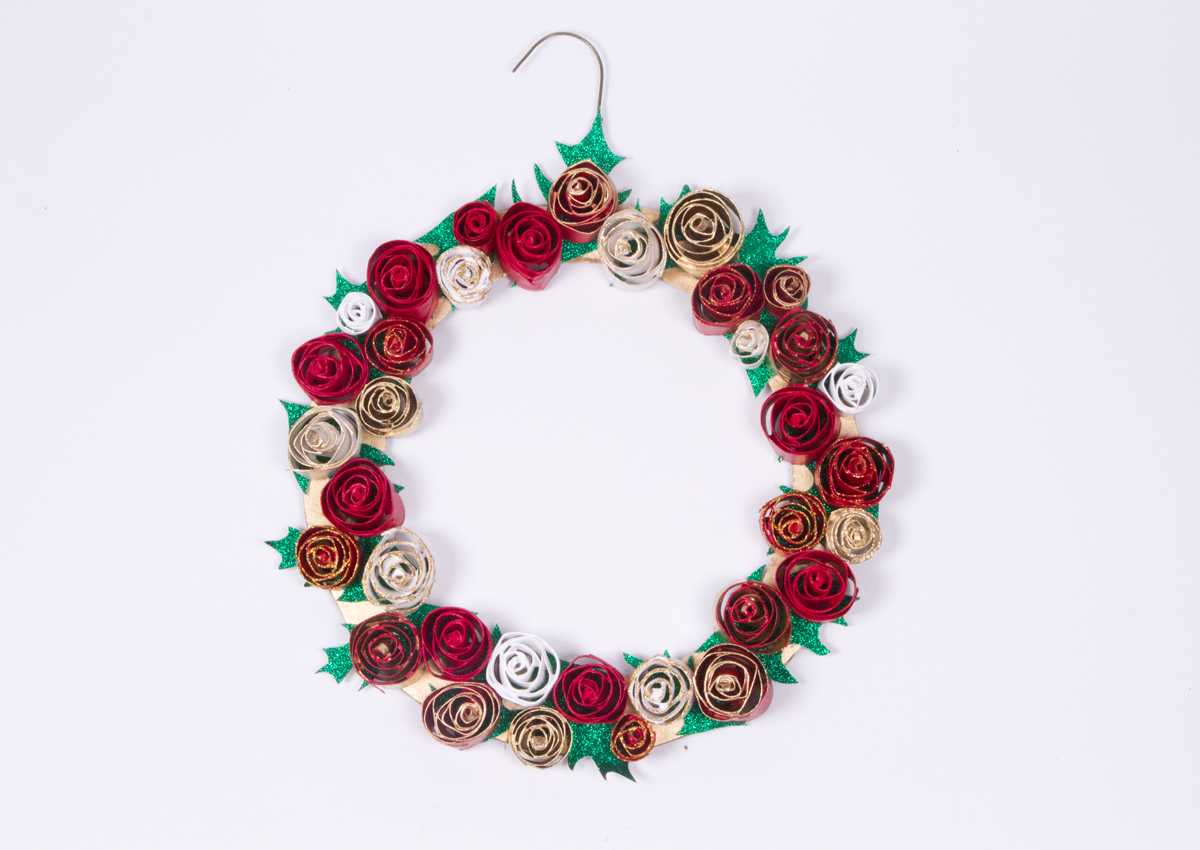
For Christmas: A faux-floral holiday wreath made from bathroom castoffs (pictured above)

What you’ll need: 20 empty toilet paper rolls; scissors; green cardstock (or a cereal box that’s been painted green); hot-glue gun; tweezers or pliers; latex paint; a wire hanger; a large piece of cardboard
1. Cut the toilet paper rolls into inch-wide spirals. (These will become rosebuds.)
2. Coil the toilet paper roll strips into loose circles (they should take the shape of rosebuds); use drops of hot glue to hold them in place.
3. Use tweezers or pliers to dip each rosebud into latex paint. (Castaneda suggests red, gold, and white.) Let them dry overnight.
4. While the paint dries, coax your hanger into a circle, but leave the curved top hook intact. (This is what the wreath will hang from.) Cut a 14-inch diameter circle, 3 or 4 inches wide, from the piece of cardboard. Secure the cardboard loop to the hanger with hot glue. Paint gold if desired.
5. Trace or draw 15 holly leaves (about 4 inches tall and 2 inches wide) and cut them out. Glue to the cardboard wreath.
6. Attach each rosebud to the wreath base with hot glue.

For Kwanzaa: A rustic decoration that celebrates the Pan-African holiday
You’ll need: 14 used dryer sheets; green, red, and black latex paint; small stocking-stuffer gifts or fragrant herbs (Castaneda suggests sweet grass, clove, and sage); a spool of string of your choice; a branch about 2 feet long; decorative beads; a hot-glue gun; needle and thread
1. Scrunch each dryer sheet into a ball and dip in latex paint in traditional Kwanzaa colors: Two black (for people), six red (for struggle), and six green (for land). Flatten the dryer sheets and spread the paint so it evenly coats each sheet overnight.
2. Stitch together pairs of dryer sheets on three sides to create seven open-top sachets. Flip the bags inside out to hide the stitching and roll the tops over about an inch.
3. Place a small pile of fragrant herbs or a small gift or trinket in each of your sachets.
4. Thread one end of a 2- to 3-foot piece of string around the top of each sachet and tie a decorative bead on the last inch, creating a drawstring that opens and closes each sachet.
5. Using the long end of the drawstring, tie the pouches to the branch, about 2 to 3 inches apart. Keep the red pouches on the left, the black one in the middle, and the green ones on the right.
6. Add a decorative bead to the ends of the strings connecting the pouches to the branch. Secure if necessary with a hot-glue gun.
7. Tie a 3-foot-long piece of string to both ends of the branch, leaving enough slack to hang the branch horizontally on a wall, like a picture frame.

For Hanukkah: A beautiful soda-can spin on the traditional menorah
You’ll need: Soda can; wire cutters; nail scissors; paper; pen or pencil; Scotch tape; hot-glue pad (or another nonstick, heat-resistant surface); hot-glue gun pad; gold spray paint; nightlight
1. Remove the tab from the soda can.
2. Using wire cutters, cut a 1-inch square from the top of the can, so it enlarges the mouth hole.
3. On a piece of paper, draw eight candles parallel to one another. Each candle should be ¼ inch thick and 2½ inches tall. Include a small flame ¼ of an inch above each candle.
4. Tape the paper to the side of the can, making sure the flames point to the bottom of the can.
5. With the paper as a guide, cut out the candle and flame shapes from the can using nail scissors.
6. Carefully remove the paper and lay it flat on a hot-glue gun pad.
7. Using the paper as a pattern, fill in the cut-out candle spaces with hot glue. Once dry, the residue will produce a candle the same shape as the candles you cut from the can. This step only applies to the candle shapes and not the flame shapes, since the nightlight will shine through the cut out flames in the can.
8. Peel the candles off the hot glue pad.
9. Fit each candle into its corresponding cutout in the can. (If necessary, secure the candle to the can with hot glue.)
10. Spray-paint the can with gold paint.
11. Fit the nightlight into the hole and secure it with a dot of hot glue.
(Check out gift ideas for the design-inspired Coloradans in your life)


